Sweet Leaf Organic Stevia Review + Sugar Free Granola Recipe!
Sweet. Crunchy. Soft. Chewy. What kind of granola groupie are you? There are a lot of personality tests out there, but I've noticed a lack of granola grading. Maybe because quiz makers know I'd break their survey in one try - since I love granola in all shapes and sizes!
So when Sweet Leaf offered to give me a sneak preview of their new organic stevia, I saw some delicious sugar free granola in my future. Like their flavored stevia drops, their organic stevia boasts zero gluten, zero artificial ingredients and zero calories. But 100% flavor and organic components.
 |
| My secret weapon! |
I first experimented by adding a small packet to my morning nana ice cream - let me tell you, Sweet Leaf packs a punch! Although it's sugar free, I only needed a quarter of their small stevia package to get my taste buds dancing. So when in doubt, less is definitely more!
Nonethess, what is used definitely makes a difference. It blasted my banana ice cream to "dessert" level with zero sugar. As for its "organic" title, while I don't shop entirely organic - I'm a college student, remember! - I appreciate that people looking for an even "healthier" sugar free alternative have yet another option on the market. As Sweet Leaf quotes on their website, Organic stevia has the same great taste and "better-for-your-body" benefits.
 |
| Brought to you by Sweet Leaf! |
That's a very good thing considering that I've been eating this granola like candy! Candy packed with healthy protein, fats and no sugar, at least.
To whip up your own sugar-free, flavorful batch of granola, raid your drawers for some of my favorite granola secret weapons.
 |
| All the goodies! |
Ingredients:
1-2 cooking trays, 1 mixing bowl, 1 mixing utensil, measurement cups, and optional parchment paper
2 cup of buckwheat groats
1/3 cup of pumpkin seeds
1/3 cup of sunflower seeds
1/3 cup of chia seeds
1/3 cup of cacao nibs
1 cup of puffed rice/cereal
2/3 cup of oatmeal (or, as I used, buckwheat and rice flakes)
6 chopped dates (or 1/4 cup of dried fruit)
2 TBSP dairy free chocolate chips
1 TBSP cinnamon
2 TBSP Maca powder (optional)
2 TBSP cacao powder
1/2 TBSP spirulina powder (optional)
1 TBSP vanilla extract
1/4 tsp of organic stevia, or stevia drops
1 big mashed banana (or 2 small ones)
1/3 cup of coconut oil
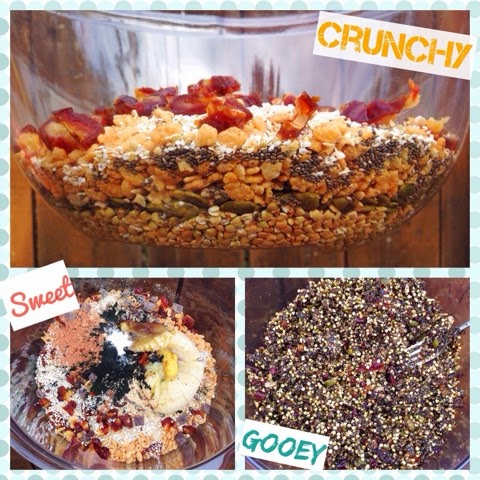
Begin by preheating the oven to 350 degrees Fahrenheit and lining (if desired) your one or two baking sheets with parchment paper. Then combine all of the dry ingredients in a large bowl. Feel free to substitute ingredients for your favorite granola goodies - I'd sure be down for some hazelnuts and cashews! - while maintaining the porportions. If needed, you could also increase the amount of stevia - I only used half of a tea package - depending on how sweet you want your granola. With the added sugar of the bananas, 1/4 tsp was plenty for me!
 |
| All the best combinations! |
Once all of your dry ingredients are thrown in, add your wet ingredients. Melt the coconut oil in the microwave if needed. If your banana is not ripe enough to mash easily, you can also microwave it for a few seconds until gooey.
Now stir, stir, stir until all of your ingredients are well combined. If your mix seems too dry, add a few tablespoons of water until you reach a sticky texture. Taste test as needed (the best part of vegan goodies is always "checking" on the unbaked product!) and then lay out your wet granola on the sheets.
 |
| I'm definitely head over taste buds! |
After many trial and error sessions (oh the horror!), I've discovered that the thinner the layer, the crunchier the granola! I ended up needing two baking pans, but if you're a gooey-granola lover (or pan limited), pile it all in one! Then set the timer for 30 minutes and get ready for your house to smell of chocolatey goodness!
In order to produce the chunkiest granola, I don't recommend stirring as it bakes, but you can do so if you want to keep your granola looser. After 30 minutes, check your granola for its doneness. I ended up pulling out my thinner tray and baking my thicker pan for another 15-20 minutes to get the ultimate "crunch" consistency, but it is just as delicious chewy!
 |
| A sprinkle here, handful there... |
Leave the granola to cool for at least an hour before bagging, and then try not to eat it all right away! I devour mine on top of nana ice cream, mixed into my Oatless oatmeal and even straight from the bag! The options are endless - even though the granola, unfortunately, is not!
Whether crunchy and sweet or soft and chewy, I'm a total granola addict. Fact is, this huge batch will probably disappear by the end of next week, but that's okay. Because eveyone needs a treat they can feel good about eating - and with some help from Sweet Leaf and their organic stevia, this sugar free granola is just that!
*I received these products without charge to review, but my opinions are all my own!*
What's your favorite kind of granola? Have you ever tried Sweet Leaf stevia? Comment below!

Sweetleaf is my life! I am a stevia a girl for life!
ReplyDeleteWow, nice information and steps to create on Sugar Free Granola Recipe. Granola is good for health and tasty. I will try this. But previously, I got this kind of information from Stevia Mystore. Thanks for sharing.
ReplyDeleteHey there! The StoreOpinion.Ca survey has now been moved to StoreOpinion-ca.me. And guess what? Loblaws has some exciting news for survey participants! They're offering a fantastic reward for survey winners - a chance to win a $1000 Optimum PC gift card! All you need to do is head over to Loblaw's official survey page at StoreOpinion Pc Optimum and participate in the survey. It's an excellent opportunity to share your feedback and possibly score a fabulous prize. Good luck!
ReplyDelete